• Home
  • Completed Costumes/Impressions
  • Emma and Her Dresses
  • Free Patterns and Instructions

Kitty Calash

~ Confessions of a Known Bonnet-Wearer

Kitty Calash

Category Archives: Making Things

A Bee in my Bonnet

10 Sunday May 2020

Posted by kittycalash in Living History, Making Things, material culture, Research

≈ Comments Off on A Bee in my Bonnet

Tags

beehive bonnet, bonnet, bonnets, milliner, millinery, prototyping, Research


Since 2014, I’ve been thinking about whale-bone and caned bonnets, trying the occasional prototype but not making much progress. Not too long ago, a friend and I were kicking around the idea of what the descriptions in ads and inventories actually meant. Becky’s research is always detailed and thorough, and I am grateful for all she shares with me.

We were specifically thinking about “beehive” bonnets, which also appear as “Sattin hives” and “women’s hives.” What on earth could those look like? In Philadelphia, “beehives” were described as being made of straw, which makes sense when you think of bee keeps. But wait, that’s not what the inventories and ads describe. A 1762 ad from South Carolina illustrates the distinction. (Hooper & Swallow advertisement, page 2, South-Carolina Gazette, 10 July 1762).

Searching ads, you start see more of these, especially between 1754 and 1768. They appear from Georgia to Massachusetts, usually called “hives,” but sometimes appearing as “beehives,” or “satin hives.”

Boston Evening Post, June 30, 1755

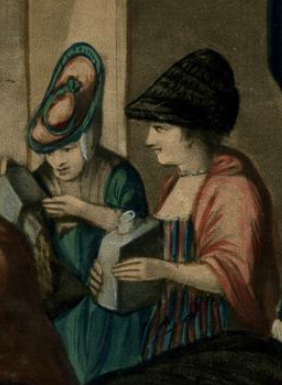
detail, A Society of Patriotic Ladies at Edenton in North Carolina. British Museum 2010,7081.3247

But what did they look like? An illustration held by the Historical Society of Pennsylvania shows a woman in a poke-like bonnet of a style we might call a sunbonnet. The shape is more in line with how I imagine the “Conestoga bonnet” might look. John Fanning Watson published his Annals of Philadelphia in 1830, and while his drawings are charming and illuminating, one wonders if they are fully accurate, since Watson was born in 1779. The preponderance of “hives” seemed to be in the southern colonies, and at last, while enjoying the British Museum’s colored version of “A Society of Patriotic Ladies at Edenton in North Carolina,” I thought I had a glimpse of a “sattin hive.”

There is much to love in this print, and I have thought about it for six years since I made the first “whale-safe bonnet.” How would you make that shape? One approach might be to use techniques not unlike those used for calashes: canes in channels.

Over the past few days, I have been playing with shapes and cane, trying to get this right. After three drafts, I’m closing in, so I decided to make one up in the last of some pale grey silk to see how it behaved. Reader, the canes are annoying, and there are changes I need to make, but as Seussical as this headwear may be, I think I’m getting closer to “women’s hives.”

IMG_2945
IMG_2946
IMG_2947

Share this:

  • Facebook
  • Pinterest
  • Email
  • Twitter

Like this:

Like Loading...

An Evening In with Emma

27 Friday Mar 2020

Posted by kittycalash in Clothing, Frivolous Friday, Living History, Making Things

≈ Comments Off on An Evening In with Emma

Tags

activities, dresses, Early Republic, Emma, Federal style, paper doll, paper dolls, Regency, things to do indoors

Journal des dames et des modes, (1812)

Just three weeks ago Drunk Tailor and I went to see the new Emma. We made an evening of it, aware that it would likely be our last excursion for some time.

Dressed in our early 19th-century attire, we had dinner out before we went to the theatre. I don’t know if this is my favorite Emma— the BBC adaptation with Romola Garai is one of my comfort movie go-tos– but it is by far the funniest, meanest, most satirical version of Emma I’ve encountered.We laughed a lot– more than most viewers, though I know the Regency Society of Virginia folks did too, behind us– and that was an interesting way to take in Austen.

There are some interesting pieces on the visual and material culture of Autumn de Wilde’s version, including one on color and class, and I’ve enjoyed seeing these pieces become part of the popular discourse around the movie and the novel. (I find I have to ignore the comments by Anya Taylor-Joy on corsets, which make zero sense to me as a wearer of 18th and early 19th century stays.)

I don’t know if we’ll stream the new Emma— the 1995 BBC Pride and Prejudice is a favorite of mine so that might be this weekend’s chocie– but today I started coloring in some paper doll dresses. A year or more ago, I made my own Emma doll, and, over time, drew several sheets of dresses. They’re here for you to download and fill in as you please. While for now these are a way for me to have all the clothes in La Belle Assemblee and Ackermann’s Repository, I also see these as potential croquis, a way to map out what I want to make. I do, after all, have a Strategic Fabric Reserve. I’ve uploaded my drawings in case you might enjoy them too (it’s an idiosyncratic style, I admit) as we all find ways to occupy ourselves indoors.

Emma and her dresses for download

Share this:

  • Facebook
  • Pinterest
  • Email
  • Twitter

Like this:

Like Loading...

Three Simple Tricks to Change Your (Sewing) Life…

05 Thursday Mar 2020

Posted by kittycalash in Clothing, Living History, Making Things

≈ 5 Comments

Tags

fabric, handsewn, sewing, tools

Practice will make you as happy as this cat.

Yesterday was #difference day in Pinsent Tailoring’s #modernlessmarch challenge, and while I’m not participating, finishing up a cap order yesterday got me thinking about what makes a difference in what I make.

I fished out the very first cap ever made, and here’s what’s made a difference:

1. Practice. Make more things. Make practice pieces. The more you sew, the better you get. That is the only way to get better.

As with writing, “butt in chair” is what will make a difference, and there is no short cut.  But the more you sew, the better you get.

Cap the First
Cap the First
Cap the Recent
Cap the Recent

2. Materials. Buy the best materials you can afford. This first cap was made of linen from JoAnn’s, while the most recent cap is made of linen cambric from Burley & Trowbridge.

Here's silk
Here’s silk
and here is linen
and here is linen

Selecting the right material for the task is critical, and higher quality materials will give you a better result. Silk and linen will give you very different results (yes, silk caps are a thing. They show up in inventories and ledgers in the Carolinas). Even poor and working-class women’s caps were made of finer materials than we can typically get today, so for caps, you are looking for a fabric that combines fineness of weave and thread with crispness.

Cap the First was made nine years ago, while Cap the Recent was finished this week. The first real cap breakthrough I had was in 2016, with the Cap of Floof, made with a finer material that allowed me to make smaller seams and successful whip gathers for what felt like the first time.

Floof!
Floof!
and more Floof!
and more Floof!

Lance needles: the best I’ve used.

3. Tools. The smaller the needle, the smaller the stitch. You want to use the smallest needle you can (different sizes are appropriate for different fabrics; thicker fabrics need longer needles). It can take time to get used to using a smaller needle, but the practice (see point 1) will pay off. Appropriate thread (finer for finer fabrics), a thimble, and sharp thread snips will make your work easier. A good iron is another necessity, and while you can substitute a rolled towel for some pressing forms, tailor’s hams and sleeve boards also make life easier and sewing smoother.

All of these things take resources, whether time or money, but the rewards are worth the investment.

Share this:

  • Facebook
  • Pinterest
  • Email
  • Twitter

Like this:

Like Loading...

A Dress for Red Hook

11 Tuesday Feb 2020

Posted by kittycalash in Clothing, Events, Living History, Making Things

≈ Comments Off on A Dress for Red Hook

Tags

1813, 19th century clothing, Federal style, New York, Red Hook, Regency, sewing project

Portrait of a Couple in the Country, Josef Reinhard, 1809

We recently returned from an event months in making, as all the best ones are, with many people making new clothes and venturing into a new era: the early Federal period. Initially, I expected to portray a widow, but ended up portraying a milliner suing for damages resulting from a breach of promise of marriage. This afforded Drunk Tailor an opportunity to be caddish and impatient, and gave me the chance to be aggrieved, which I do enjoy.

Because I initially thought I was portraying a widow, I checked through my stash for appropriate fabrics, and, finding only yardage already designated for future projects (coming in March! yay!), I ordered black gauze from Renaissance Fabrics. The local fabric store failed me, and somehow I got fixated on transparency and weight: I wanted a particular drape that a heavier stuff could not provide.

I looked at fashion plates of mourning wear but came across an 1809 painting by Swiss painter Josef Reinhard and fell in love. Still, here I was on the train tracks to mourning attire when I was portraying a forsaken milliner. Fortunately, the event organizers provided documentation from local newspapers, and a plausible case could be made for being in mourning for my recently deceased father– adding another layer of poignancy to my abandonment and financial precarity.

The gown I made is my third run at an early 19th-century surplice front.  The pattern I scaled up from An Agreeable Tyrant was a reasonable place to start, though my shape has changed somewhat in the nearly three years since I first started on that. In the end, I found that the shape of the lining or base of the canezou was a better starting point. Using that back and the general shape and grainline of the front, I re-draped the front bodice pieces to my current size, adjusting the line over the bust and adding an underbust dart, based on darts seen in period Spencers.

Fronts
Fronts
and back
and back

It took about three muslins before I had a bodice that fitted well; then it was on to the sleeve. Thankfully, that only took two muslins to rework the curve of the sleeve head and the shape of the underarm, and adjust the grainline to correct the drape of the arm.

I like the contrast between the white chemisette and the black gown

The surplice or cross-front gown appears in many images; it’s a comfortable form, and uses relatively little fabric to achieve the effect. It would also be a good form for nursing mothers, and while that was not a consideration for me, I do like the way the neckline can show off a chemisette.

I wore this over a pink wool petticoat and the white bodiced petticoat/gown that I wore under the canezou; I’d prefer a black petticoat but the one I is made for 1790s gowns and required shortening. In the future, I’ll make a black or grey silk taffeta to wear under this gown. But first I’ll need new linen petticoats since two have disappeared.

The hem edge, as always for me, was little uneven despite measuring carefully multiple times, but a ruffle solved that and added weight to the hem, helping the skirts hang and move better. The trim is based on a drawing in the Nantucket Historical Association collection and uses a quantity of black silk ribbon (which I can buy wholesale thank goodness!).

I’m generally pleased with this pattern and the finish of the gown. The lessons I’ve taken from this experience are about packing lists (and not putting the box of bonnet behind the door where it is invisible) and accessories. Once you have a pattern that really works for you– a well-fitted bodice or waistcoat, coat, and trousers– what you need to round out your look are accessories. Those are the pieces that can expand your wardrobe, dress it up or down, and generate multiple looks from just a few pieces. If that sounds like capsule wardrobes or fashion magazine advice, well, just because you saw it in Mademoiselle or Glamour doesn’t mean it isn’t useful advice.

Portrait of Sarah Comstock Coffin and Children, ca. 1815. Nantucket Historical Association, 1917.0034.001
IMG_1428

Share this:

  • Facebook
  • Pinterest
  • Email
  • Twitter

Like this:

Like Loading...

Bonnet Remodel

27 Monday Jan 2020

Posted by kittycalash in Clothing, Living History, Making Things, Reenacting

≈ Comments Off on Bonnet Remodel

Tags

1812, bonnets, Federal style, milliner, millinery, Red Hook, sewing


I had a bonnet I made in 2014 (I think) that had been languishing in a box for years. I liked it– the soft tip was unusual, and the vintage ribbon and pink paper roses from the V&A went well with the dull grey– but I didn’t wear it. Sunday morning, I woke up resolved to remake the bonnet into something I will wear.

An upcoming weekend event in Dutchess County has me trawling through the fashion plates again, along with research helpfully sent along by the event organizers. A particular plate has stuck with me for some time, and finally I had the skill set necessary to tackle the thing. It takes making and looking and failing and remaking to figure out these things.

IMG_1348
IMG_1351
IMG_1356

Step one was to take apart the bonnet-as-was. Satisfying work, really, not as unnerving as I feared it might be. And then? Paper patterns to figure out the sizes of the ridge and crest pieces.

I’d already committed myself to the silver-grey taffeta– slightly slubby, so second-chop, I’d already made muff cover, and had just enough left for a bonnet. The silver-grey seemed well-suited to a helmet-inspired style, and came close to the deep grey of the gros de Naples of the plate.

For mull, I used organic cotton quilt batting. It’s a little thick, but I pull my stitches tight and don’t want the buckram or pasteboard to show too much. The old brim piece served as a pattern for new, though I did have to use a different color for the brim lining.

The ridge was cut from homemade buckram (gum arabic on coarse linen from Burnley and Trowbridge). I used heavy cotton organdy to interline the crest. I know there is a way to get the ruffle more even, but my brain hasn’t produced it yet. Cartridge pleats and starch come to mind, along with goffering irons, as places to start. For now, this represents a Hudson River Valley milliner’s interpretation of the latest fashions.

IMG_1360
IMG_1361
IMG_1363

The crown is taken from the 1770s bonnet I made, to take advantage of the way that crown slopes from a brim shaped like this one. If I were to make another one of these, I might switch up the order of assembly, and I might make the ridge piece of interfaced taffeta instead of taffeta-covered wired buckram.

IMG_1365
IMG_1369
IMG_1366

The finished bonnet reused the same ties as the original bonnet, with a similar Petersham or grosgrain ribbon band. With my 2014 pelisse and a new muff, the only new accessory I’d like to make (or can remember wanting to make) is another, slightly larger, reticule to complete the ensemble.

IMG_1371
IMG_1339

Share this:

  • Facebook
  • Pinterest
  • Email
  • Twitter

Like this:

Like Loading...
← Older posts

Archives

wordpress statistics

Creative Commons License
Kitty Calash blog by Kirsten Hammerstrom is licensed under a Creative Commons Attribution-NonCommercial-ShareAlike 4.0 International License.

Website Built with WordPress.com.

  • Follow Following
    • Kitty Calash
    • Join 619 other followers
    • Already have a WordPress.com account? Log in now.
    • Kitty Calash
    • Customize
    • Follow Following
    • Sign up
    • Log in
    • Report this content
    • View site in Reader
    • Manage subscriptions
    • Collapse this bar
 

Loading Comments...
 

    %d bloggers like this: