• Home
  • Completed Costumes/Impressions
  • Emma and Her Dresses
  • Free Patterns and Instructions

Kitty Calash

~ Confessions of a Known Bonnet-Wearer

Kitty Calash

Category Archives: material culture

Bag and Baggage

29 Thursday Aug 2019

Posted by kittycalash in Living History, material culture, Reenacting, Research

≈ 5 Comments

Tags

accuracy, authenticity, baskets, common people, interpretation, kickstarter, Research, shopping

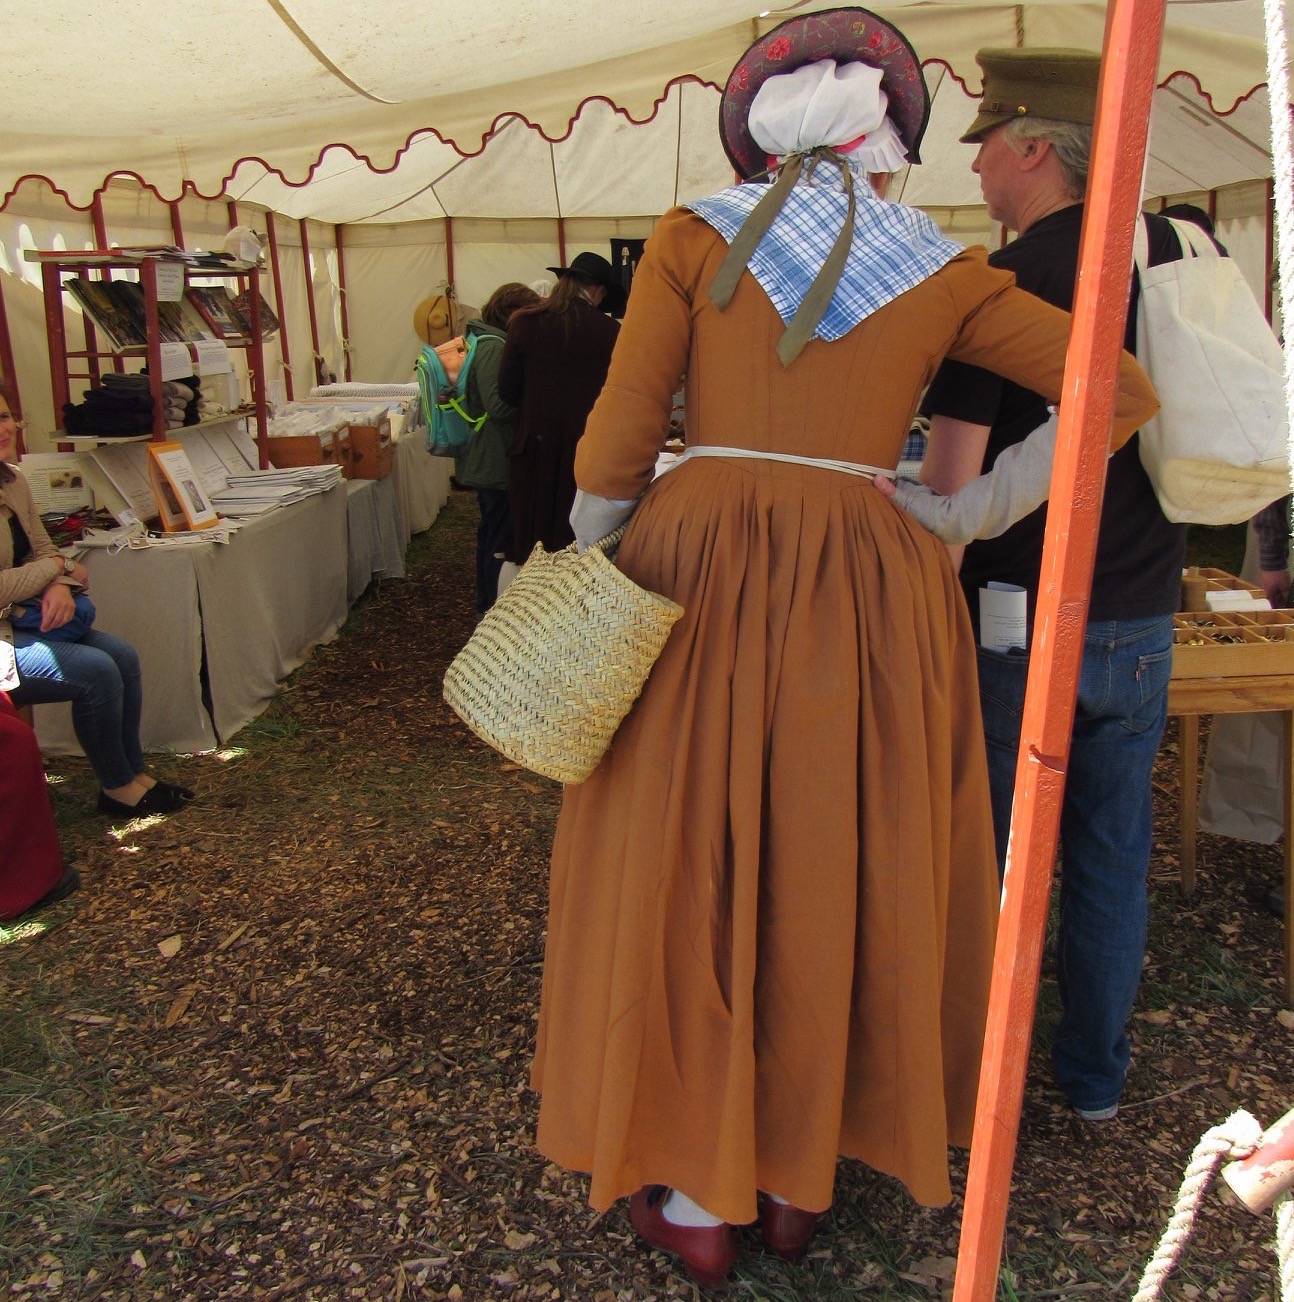
Shopping with a basket at Fort Fred. (photo by Denise Wolff)

The subject of carrying things at living history events never seems fully resolved. There were the fireworks I like to call Basketgate, and in the four years since, more women have been carrying frails than firm-sided baskets. But here’s the thing: baskets were not used as purses. They were used for shopping, and for babies (thanks, Ruth!), not for toting about one’s personal effects. That’s what pockets were, and remain, for.

Pocket, silk on linen, ca. 1780. Martha Elizabeth Spach (probably). MESDA 2400.

18th century women were not cursed with the tiny pockets of today’s fashionable jeans. No, they had voluminous pockets capable of holding a vast array of items: pocket journals, purses (like our wallets), game tokens, an orange, keys, and almost anything else you can think of. The pocket shown in the image is 15″ long by 11″ wide, which is a fairly typical size, though some were even larger. When I made these, I described them as “large enough for a puppy,” and Facebook wouldn’t let me post them. There is now a full-length book on The Pocket and I look forward to reading it next year, when my ILL will finally request it ($50 being too dear for my budget). In the meantime, the Victoria and Albert Museum will get you started if pockets are new to you.

So, baskets for shopping and pockets for personal things. What else might you use to convey something from one place to another?

Paul Sandby RA, 1731–1809, British, London Cries: A Man with a Bundle, Old Clothes, undated, Watercolor on medium, cream, slightly textured laid paper, Yale Center for British Art, Paul Mellon Collection

A wallet, of the kind reenactors call a “market wallet,” though that was not the period term. You can read about these in an article by Charles LeCount. The man in the watercolor has a very full wallet over his shoulder, demonstrating the larger end of the wallet spectrum.

And to carry your money in? A purse or pocketbook, sometimes in leather, sometimes in flame stitch, and sometimes in silk.

Leather...
Leather…
flamestitch...
flamestitch…
and silk
and silk

Which one you choose depends on who you portray, and where. Silk wallets or pocketbooks belong to a particular class and the ones in museum collections are often from France. Flamestitch wallets are reasonably common in North America among people with the time to make them. The really neat thing about these is that the patterns show regional differences, so you can tailor your choice to your place. (I lack the patience, skill, or time to really make headway on mine, but in addition to a wonderful custom pattern, I found kits here.) I have a leather one I love, made by this fellow craftsperson and friend.

Miser’s purse, early 1800s, maker unknown. Purchased 2002. CC BY-NC-ND 4.0. Te Papa (GH009865)

Your coins? A purse. (we call these miser’s purses, though long purse or ring purse might also be used. The forms originates in the 17th century, and although it is most popular in the 19th century, it does appear in the 18th century. It’s just not common, so no, not everyone should have one. A simple bag will do for those with coins they wish to keep wrangled.

Servant Returning from the Market, 1739, Jean-Baptiste-Simeon Chardin. Louvre Museum,
MI 720

A bag, a pillow case, or even a tied cloth, as seen in the painting by Chardin.

There are lots of options for carrying chattel, lumber, and personal items, and most leave your hands free. But for women, the first place to start is tie-on pockets, and for men, the pockets in your coat. After all, the pocket bags in a typical Henry Cooke frock coat will hold a six pack between them. 

If you like this content, please consider supporting me by making a pledge to my Kickstarter.

Share this:

  • Click to share on Facebook (Opens in new window) Facebook
  • Click to share on Pinterest (Opens in new window) Pinterest
  • Click to email a link to a friend (Opens in new window) Email
  • Click to share on X (Opens in new window) X
Like Loading...

“Now Selling at Prime Cost”

28 Wednesday Aug 2019

Posted by kittycalash in Clothing, Living History, material culture, Reenacting, Research

≈ 2 Comments

Tags

18th century, kickstarter, living history, merchants, milliner, millinery, millinery shop, women's history, women's work

Although I’ve portrayed a milliner before, the earliest iteration has been as a shopkeeper in August, 1804, so I thought it best to refresh my knowledge of what 18th century milliners advertised. (Deep dives into bonnets help me focus on bonnets, but necessarily what else was being sold.)

Pennsylvania [Philadelphia] Packet, January 15, 1772.


One of my favorite ads is from the January 15, 1772 Pennsylvania Packet. Mary Symonds of Philadelphia published an extensive list of goods, many of which will lead you down a rabbit hole. Three of the listings had particular appeal.

“Womens’ and childrens’ black and coloured silk, Dunstable and chip hats, and bonnets”

“Black and coloured silk” almost surely encompasses the range of colored silk bonnets seen in Boston advertisements, but what’s the difference between Dunstable and chip hats? Price, of course. What most of us think of, or call, “chip” hats should be called Dunstable or simply straw.

Silk covered chip hat, Snowshill Wade Costume Collection, NT 1349840
Detail, silk covered chip hat, Snowshill Wade Costume Collection, NT 1349840

Chip hats like the one above in the Snowshill Wade Costume Collection, were made of plaited (woven) thin strips of wood, more like flat baskets or chair seats.

Straw hat, Snowshill Wade Costume Collection, NT 1349843
Detail of straw hat, Snowshill Wade Costume Collection, NT 1349843

Straw hats, like the one above (also in the Snowshill Wade Costume Collection) are clearly finer than chip and do not need to be covered. The earliest description of the distinctions between hat types that I’ve found thus far is from 1815, in “An Encyclopæaedia of Domestic Economy, Comprising Such Subjects as are Most Immediately Connected with Housekeeping etc etc” which goes into some detail.


The most entertaining discussion I found was in  The Sessional Papers Printed By Order Of The House Of Lords, Or Presented By Royal Command, In The Session 4 And 5 Victoriae And The Session 5 Victoriae 1841. The recorded exchange resonates with current discussions of tariffs on imports, but the really revelatory bit is this:

Class distinctions expressed in materials and apparel are eternal.

“Tobines” were new to me (or at least forgotten) and have nothing at all to do with the bishop of Providence. Thankfully, Textiles in America has the answer: “A wide variety of dress materials from fine silks to silk and worsted, and linen and cotton combinations that have warp-float patterns of small flowers or intermittent stripes and dots.” (p 367). Once you’ve seen it, you realize you’ve seen it before.

Berch papers, Nordiska Museet.

“Childbed baskets” were also a new concept to me, but The Female Reader, Or, Miscellaneous Pieces in Prose and Verse; Selected from the Best Writers, … for the Improvement of Young Women illuminated the term; the current equivalent is a layette set that includes bedding, and goes beyond the crocheted sweater, cap and booties some of us came to fear receiving. (Mint green acrylic? really?)

It’s a wide range of goods for women to buy (including small accessories for the men and boys in their families), and somewhat beyond the bonnets-hats-jewelry-trimmings we typically associate with milliners. While I don’t have any plans to start manufacturing chip bonnets or making up childbed baskets, I am definitely intrigued by the possibility of expanding my “offerings.”

Share this:

  • Click to share on Facebook (Opens in new window) Facebook
  • Click to share on Pinterest (Opens in new window) Pinterest
  • Click to email a link to a friend (Opens in new window) Email
  • Click to share on X (Opens in new window) X
Like Loading...

Making Plans….

26 Monday Aug 2019

Posted by kittycalash in Living History, Making Things, material culture, Museums, personal, Reenacting

≈ 1 Comment

Tags

historic house museums, kickstarter, living history, milliner, millinery, millinery shop, Van Cortlandt House Museum

I have set my sights on being at Van Cortlandt House Museum’s Second Annual History and Culture Fair on Saturday, September 21. This is a bit of a stretch: It’s farther than Philadelphia, where I’m scheduled to be the following weekend at the Museum of the American Revolution– and I want tweak that impression and its material culture a bit, too. Still: setting up a ca. 1777-1780 milliner and mantua maker or merchant display has been on my to-do wish list for years, and I’m pretty sure I can pull this off as long as I modify/upgrade items already in my closet.

There are enough images to provide good inspiration and ways to start accessorizing.

Several prints  from the British Museum provide guidance.

It’s clear– as I knew already– that my accessory game requires major upping. But this is solvable! It’s not ideal, being in a situation where I can’t buy new fabric, and I don’t have the time to make up the fabric I do already have in the garment styles I need. This is no time to start a new patterning project!

So this means making accessories to upgrade a gown and petticoat already on hand and known to fit (though they should be fit-tested once again before committing!).

Which dress? Why, Nancy Dawson, of course. She’s the brightest and most stylish gown I have. Thankfully, I have upgraded my cap collection, and could even– probably– manage a new cap in the time allotted.

So what do I need? A well-decorated, possibly floofier cap, a LBB (™) of the kind worn in “The Rival Milleners”, a breast knot or bow, a new fine silk or cotton apron, and some kind of sleeve treatment.

The maid in the back of “A Morning Visit,” carrying in the tea tray, demonstrates the more understated upgrades I think I will be able to manage in the time I have. In a year, a trimmed silk gown can happen. In a month, it cannot.

The main upgrade I’d like to make is to add a red silk quilted petticoat, since they appear in so many prints with cotton print gowns, including a print of Nancy Dawson herself.

Miss Nancy Dawson, aquatint print. Victoria and Albert Museum. E.4968-1968

I almost assuredly have red silk in my stash: the question is, can I find it, back it, and quilt it in time? Probably not. So there are choices to be made, like the sensible one of simply upgrading sleeve finish and apron and adding bow knots.

Those are just the upgrades I hope to make to my personal kit! I need a dome top trunk (underway; I need the one I have for Elizabeth Weed), and there are inventory items to make that have been on the list for a while.

All of this has to get done while I’m splitting my 55-60 hour weeks between commissions and a retail gig (which I am trying to streamline!).

Once again, I start down the path of madness. Won’t you join me? I think it’ll be a blast!

Share this:

  • Click to share on Facebook (Opens in new window) Facebook
  • Click to share on Pinterest (Opens in new window) Pinterest
  • Click to email a link to a friend (Opens in new window) Email
  • Click to share on X (Opens in new window) X
Like Loading...

Hints for a New Hobby

29 Monday Apr 2019

Posted by kittycalash in Living History, Making Things, material culture, Reenacting, Research

≈ 7 Comments

Tags

costuming, living history, Making Things, progressive reenacting, Research, sewing

The historical costuming/living history/reenacting hobby can be a daunting one to pick up. When I started, I was fortunate to have a background making things, including sewing my own clothes, as well as a career that taught me research skills, and gave me easy access to primary sources. Those factors made skill building relatively easy, though I definitely had a learning curve specific to what I was doing. As the season opens and people start to ease into new units, I thought about things I found that made this hobby a little easier to manage, and skills easier to acquire.

Same years....
Same years….
different class levels

Know who (and when) you are. When you step into the past, who are you? Where are you from? What year are you representing? With answers to these questions, you can begin to sort out what you need to know, and where you need to look for answers. What you’ll wear in North Carolina is not what you will wear in coastal New England. The styles of 1750 are not the same as those of 1780– and fashion information traveled quickly from England to America. American colonists were as stylish (or more so) than their English counterparts. Wearing a gown 20 years out of date without alterations is only going to work well if that gown really shows its age (and you do, too).

Learn to do research. If you are going to strike out totally on your own, you need to be able to do research and sift through the sources you find to understand and interpret them appropriately for your situation. What is right for Costume College may well not be right for a camp follower, no matter how accurate the fabrics or construction. It seems so obvious (and in the case of a silk sacque back gown, it really is) but in other ways it’s not. Jackets aren’t going to be right in New England, and calicos are more common in Philadelphia and Rhode Island than they are in Boston.

Lance needles: the best I've used.
Lance needles: the best I’ve used.
Rowenta steam iron
Rowenta steam iron

Buy good tools. Really: tools matter. Sharp shears, sharp thread snips, good, sharp needles, sturdy pins, a pin cushion, a cutting grid, a steam iron, a sleeve board, a sturdy ironing board: all of these things make my sewing life so much better. (I actually own three ironing boards: a full size board, a table top board, and a sleeve board and use them all.) Tailor’s hams are also useful– that’s what I steam my caps on.

Ruffle attachment in progress. Possible thanks to the material and the needle.

Use good materials. Good fabric is expensive, but what’s your time worth? If you calculate the per-wearing cost of a garment, you’ll find that the “cost” decreases over time. One of my favorite gowns is made of $2.99/yard fabric from a mill store in Rhode Island. (I was very lucky to find a woven check that matched one in a RI sample book.) I bought five yards, so $15. I’ve worn that gown more times than I can count, and it is perfectly filthy. If we calculate $450 for hand sewing, the total cost is $465. Since April 2014, I have worn that gown 12 times (that I recall), making the per-wearing cost $38.75. I’d call that a good value. If we count just the yardage, it’s $1.25 a wearing and honestly, you cannot do better that that.

IMG_7948
IMG_7947

When it comes to shifts, the ultimate per-wearing cost is even less. My most recent shift of hand-woven linen with vintage linen sleeves would have been $450 in materials, and $425 in hand-sewing. $875 seems crazy, right? Consider the shift I made in 2011, worn to almost every 18th century event I’ve attended (I had two); I’ve worn that shift….45 times that I can recall. That’s $20.83 per wearing, a better value over time than the $2.99/yard gown. If a soldier’s coat can cost $800, and you are going to every event your soldier goes to, an $800 shift is as good a value as the coat, and possibly more essential.

Cost aside, the value of good materials is in the time they save in making. Well-woven linen is easier to sew and will need less mending over time. Sharp shears cut cleaner. Sharp needles sew better, and smaller needles give you finer stitches.

d’oh! surgical tape made this *much* better later.

Learn to sew with a thimble. Your fingers will thank you. I use a leather thimble with a metal tip (from the quilting notions section) and it helps. Thimbles are essential when sewing heavier fabrics like broadcloth and indispensable if you make your own stays (and you can expect bleeding even with a thimble).

Practice patience. Learning a new skill, or refining one you already have, takes time. It isn’t always fun. I get sick of sewing, and have to switch to something else (like cutting out, or research, or patterning) or take a break. Recognize that frustration is often the moment before you master something new, but also know when frustration means it’s time to stop. Just as we build muscle on rest days, our brains process skills when we stop. Then, the next time we pick something up, we’ll be stronger, or more skillful, than if we hadn’t stopped. (This New York Times article was helpful, and inspired this post.)

A purchased bonnet because it’s one I can’t make.

Buy what you cannot make. I thought I needed to make everything myself (with the exception of men’s hats and buttons) but that’s just not true. If you can’t manage fine sewing, buy a cap! If you hate assembling tricky things, buy mitts or a bonnet. I bought caps when I couldn’t make them as well as I wanted, and it saved me hours of frustration. I love flamestitch pinballs, but I can’t manage that needlework yet; lucky for me, I know someone who excels at it, so I can buy from her. Other people have skills, and buying things from them will save you time and frustration, so you can focus on what you really want to do.

Share this:

  • Click to share on Facebook (Opens in new window) Facebook
  • Click to share on Pinterest (Opens in new window) Pinterest
  • Click to email a link to a friend (Opens in new window) Email
  • Click to share on X (Opens in new window) X
Like Loading...

To Make a Standard

22 Monday Apr 2019

Posted by kittycalash in History, Literature, material culture, Museums, Research

≈ 5 Comments

Tags

flags, Flower's Artificers, material culture, Museum of the American Revolution, Rebecca Flower Young, Research, sewing

British wool bunting flag said to have been given to Tecumseh. NMAI Catalog number 23/730.

When I set out to “be” Rebecca Young, I thought I knew how flags were made in the 18th century– after all, I’ve made and seen a wide range of 18th and early 19th century items. But I was surprised when I got a look at a War of 1812 flag in the collection of the National Museum of the American Indian. (This was the closest, fastest option for getting a close-up look at an original, near-period flag in wool bunting, thanks to an inside connection.)

The questions I had were:

What materials were used? (My guesses were correct: wool bunting and unbleached linen thread)
What seam techniques were used? (See below)
How was a flag assembled? (Sequence of parts; see below)

The conservator shared the flag’s condition and treatment report with me in advance, and it was helpful:

My sketch of the Tecumseh flag

“Based on notes written by Phyllis Dillon, 1977(?): The flag is constructed of 9″
wide panels of plain weave wool bunting (24 threads/inch) sewn together with french seams (approx. 1/4″ wide) using beige (white/red) and brown (blue/white; blue/blue) 2-ply S linen threads in a running stitch. The canton is constructed similarly using strips of white and red bunting with similar thread count. The hoist (approximately 1 1/4″ wide) is made from a plain weave, coarse, undyed linen folded over the raw edges of the seamed rows of bunting and stitched with a beige (undyed) linen thread; there are three hand-stitched grommets/eyelets at the corners and the center of the hoist which appear to use the same type of linen thread as the hoist stitching. (See analysis section for fiber ID). The blue bunting at the lower and upper edges of the flag are selvage edges, the fly edge is folded over and stitched with a 1/2″ wide hem.”

The date of the notes (42 years ago?) concerned me, and I wondered about the french seams. Most of what we see in the period are felled seams, so it seemed possible there was some confusion about the terminology. I’m confused about it after looking at tutorials and descriptions online, but perhaps that’s just me– in any case, the only way to answer this was to go and look.

What did I find?

Mistress V shows visitors our modern wool bunting flag

Materials
Wool bunting and silk were the most common materials used to make flags, colo(u)rs, and standards in the 18th and early 19th centuries. Colours, as advertised by Rebecca Young, likely referred to regimental colours, though a naval “colour” could mean a national flag flown by the ship. During the Revolutionary War, there were state navies in addition to a Continental Navy, further complicating the issue. (This complication also existed in the army. There are parallels today in the state National Guard units, which operate under a state or commonwealth governor, unless called into federal service. It’s your state national guard that comes to dig you out of your car in a major blizzard, but they can also be called to serve in wars, as you may recall from such debacles as Abu Ghraib.) Bunting came from Sudbury, England, and was woven in narrow strips. The strips on the Tecumseh flag are about 9 ½” seamed, suggesting that the width was about 10” including selvedges. Narrow strips are more flexible for assembly, and allow extensive use of selvedges to make seams narrower and stronger, because they’re less likely to fray.

Techniques
The running stitches in the Tecumseh flag threw me, because I’d expected back stitches, or combination stitch at least, but when I started working with the bunting, I understood. The loose weave of the bunting will pull and distort if you apply too much tension, so a backstitch would, in the end, be less useful than a running stitch. I doubt this is true of silk flags, though; silk, being more tightly woven, would better withstand a backstitch.

Wrong Side
Wrong Side
Right Side
Right Side

Because the Tecumseh flag is mounted and framed in a plexiglas case, I couldn’t touch the seams, or see the backs, and the conservators don’t seem to have photographed both sides when the flag was being treated– or at least images were not available to me. This leaves open the question of exactly how the seams were done, but my best guess based on areas of loss is that the strips were stitched together with a slight offset, like a felled seam, and then the overlap was tucked under and stitched down with a running stitch.

women sewing

This is less efficient: one person assembling an entire flag alone.

Assembly
This was probably the most delightful part of the research: figuring out how all the pieces went together. Once you see it, you can’t unsee it: flags were assembled in component parts, which were then assembled into wholes. Once we were working on the flag at the museum, the reason became clear: it’s so much quicker and easier to have multiple people working on parts, with one person assembling these parts, than to have one person per flag. This is proto-assembly line work, and it existed in 18th century workshops from tailors to cabinetmakers. Specialization equals speed, and the key to making money as a contractor supplying the army was quantity.


Canton components: A, B, C, D , E and F are assembled; AEB and CFD are sewn together to make two long rectangles, which are then sewn to the long sides of G.

In the case of the Tecumseh flag, there are three main components: the lower three strips, the upper three strips, and the canton, which is comprised of 7 parts. Each was assembled individually; then the canton and the three shorter strips were joined, and sewn to the long lower piece. After that, the hoist was attached and the far edge of the fly hemmed. Only then was the flag finished and ready for delivery.

Describing how strip(es) were assembled to become the Fort Mifflin flag.

The Fort Mifflin flag, 13 stripes of red, white and blue bunting, ending in red, would have been assembled in strips of two and then three, and then grouped and assembled. Working with Mistress V, the greater efficiency of assembling components became clearer. This hand-on quasi-experiment clarified some questions about how military contractors worked in the 18th century– at least the ones sewing. The system had to include multiple hands, working together in a shop or doing piecework at home for assembly elsewhere. There was just no other way to efficiently make the quantities of goods– 500 linen liners for light horse caps; 293 shirts; multiple standards and colours– at the speed the army required. The quantities also suggest that Rebecca Young was not just a widow-turned-contractor, but that she had working and organizing experience before she was widowed, along with a network of contacts who, along with some of her children, helped produce these goods.

Share this:

  • Click to share on Facebook (Opens in new window) Facebook
  • Click to share on Pinterest (Opens in new window) Pinterest
  • Click to email a link to a friend (Opens in new window) Email
  • Click to share on X (Opens in new window) X
Like Loading...
← Older posts
Newer posts →

Archives

wordpress statistics

Creative Commons License
Kitty Calash blog by Kirsten Hammerstrom is licensed under a Creative Commons Attribution-NonCommercial-ShareAlike 4.0 International License.

Website Built with WordPress.com.

  • Subscribe Subscribed
    • Kitty Calash
    • Join 621 other subscribers
    • Already have a WordPress.com account? Log in now.
    • Kitty Calash
    • Subscribe Subscribed
    • Sign up
    • Log in
    • Report this content
    • View site in Reader
    • Manage subscriptions
    • Collapse this bar
 

Loading Comments...
 

    %d